[[ Spoiler alert: VM disk image available for download, link at end of post ]]
In order to setup the software to serve our Xylogics Micro Annex XL terminal server, we needed to install it on a Unix host. I wanted to spin up a new Unix VM to try out their software, and one of the supported OSes is FreeBSD 2.0.5. So, I decided to build a FreeBSD 2.0.5 for this project and possible future use.
Installing FreeBSD 2.0.5 was a little bit more challenging than expected. This release does not support IDE CD-ROMs, nor either of the SCSI CD-ROMs available in VirtualBox. I settled on installing from a DOS partition, which sounds like an odd choice, but was pretty common at the time and is straightforward. There was no support for a PXE install. Overview of steps to install in VirtualBox:
- Create VM with OS/Version: FreeBSD (32-bit), 16MB RAM, Chipset: PIIX3
- Disable Audio and USB
- set IDE controller to PIIX3 type
- create a HDD named dos.vdi, 400MB
- install FreeDOS from floppies on the HDD
- attach CDROM with 2.0.5-install.iso
- boot into DOS, CDROM should be available at D:
- Create floppies using the rawrite.exe utility on D:. use rawrite to write boot and root floppies to NEW blank images you create in virtualbox. i called these bootflp.img and rootflp.img [[note: this is necessary because the floppy image files from freebsd 2.0.5 somehow don’t work as floppy images to Virtualbox]]
- mkdir c:\freebsd
- xcopy will ask if your target is a file or directory, choose Directory
- xcopy stuff:
xcopy /s d:\floppies c:\freebsd\floppies
xcopy /s d:\dists\bin c:\freebsd\bin
xcopy /s d:\dists\commerce c:\freebsd\commerce
xcopy /s d:\dists\compat1x c:\freebsd\compatq1x
xcopy /s d:\dists\compat20 c:\freebsd\compat20
xcopy /s d:\dists\dict c:\freebsd\dict
xcopy /s d:\dists\games c:\freebsd\games
xcopy /s d:\dists\info c:\freebsd\info
xcopy /s d:\dists\manpages c:\freebsd\manpages
xcopy /s d:\dists\proflibs c:\freebsd\proflibs
xcopy /s d:\dists\src c:\freebsd\src
xcopy /s d:\dists\XF86311 c:\freebsd\XF86311
xcopy /s d:\dists\xperimnt c:\freebsd\xperimnt
Now, the FreeBSD installer will be able to read the source install files from this DOS filesystem. Shutdown the VM. Attach a new HDD, size 1500MB, name freebsd.vdi. Tweak the hard disk attributes so that dos.vdi is in second position as IDE Primary Device 1, and the new freebsd.vdi is in first position as IDE Primary Device 0.
Now, boot from the FreeBSD bootflp.img file and proceed in the installer. Follow normal install steps, it should recognize wd0 as the new empty disk to install on. In partitioning setup, select to use entire disk for FreeBSD and set it as bootable. In disk labelling, I created these labels, in this order:
- 50MB filesystem, mountpoint /
- 16MB, freebsd-swap
- 100MB filesystem, /var
- 100MB filesystem, /tmp
- remaining space filesystem, /usr
Choose dos partition as install source, it should automatically detect the dos partition and use it without any further intervention.
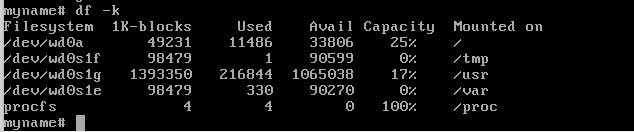
I chose X-Developer distribution sets, here’s what the filesystem layout and usage looks like after install:
Unfortunately, VirtualBox does not have a 10Mbps emulated NIC compatible with this vintage of FreeBSD. So, my next step will be to move the VM to QEMU and try to get it working there with a NIC.
The VM disk image of this install is available for anyone who wants to use it, here it is in vmdk format, there is no root password: freebsd205-disk001.vmdk
to QEMU
My next step was to Export the VM from VirtualBox, into OVA format. This can be converted into a qcow2 disk image that we can then boot with QEMU:
mark@mark5530:~/vms$ tar -xvf freebsd205.ova
freebsd205.ovf
freebsd205-disk001.vmdk
freebsd205.mf
mark@mark5530:~/vms$ qemu-img convert -O qcow2 freebsd205-disk001.vmdk freebsd205.qcow2
mark@mark5530:~/vms$ ls -la freebsd205.qcow2
-rw-r--r-- 1 mark mark 285212672 Oct  1 21:12 freebsd205.qcow2
mark@mark5530:~/vms$ du -sh freebsd205.qcow2
117M    freebsd205.qcow2
and I can boot the VM with qemu, here using qemu-system-i386 version 6.2.0 on Ubuntu 22:
sudo qemu-system-i386 -cpu pentium -m 16 -device ne2k_isa,netdev=net0,mac=00:00:0d:31:04:11,iobase=0x280,irq=5 -hda freebsd205.qcow2 -netdev tap,id=net0Note the iobase and irq settings specified, those were necessary. iobase 0x280 matches up with the ed1 device name in FreeBSD, and without setting irq 5 the NIC would print this error as soon as trying to configure it:
ed0: device timeoutattach to bridge: on ubuntu-lab machine i’m starting it up to attach to existing bridge br0 and set the video console to be VNC accessible:
qemu-system-i386 -cpu pentium -m 16 \
   -device ne2k_isa,iobase=0x280,irq=5,netdev=net0,mac=00:00:0d:ac:34:ef \
   -netdev bridge,id=net0,br=br0 \
   -hda freebsd205.qcow2 \
   -display vnc=127.0.0.1:1
now in the freebsd VM console, login as root user and bring up network with:
ifconfig ed0 10.254.255.33 netmask 255.255.255.0
route add -net default 10.254.255.1
run adduser to add a user , you can then telnet in as this new user and su - with no password